QuickStart
Note
RocketCEA on Windows has become much easier for versions 1.2.0 and above.
In fact, in most situations, Windows users can skip the step of installing MinGW gfortran and simply install a pre-compiled binary wheel for python 3.7 through 3.12.
The deprecation of numpy.distutils forced a FORTRAN build conversion to meson that has turned out to be a nice improvement. (Many thanks to joel-martin for critical help with that conversion.)
Install Numpy & Matplotlib
When installing RocketCEA from source code or from a PyPI sdist, RocketCEA depends on f2py to compile the FORTRAN NASA CEA code and f2py is part of numpy. After compilation, numpy will needed to interface with the compiled code.
RocketCEA also makes use of the matplotlib package for creating plots.
An optional package for some advanced features is scipy.
To install numpy, matplotlib and scipy, give the commands:
pip install numpy matplotlib scipy

OR perhaps...

pip install --upgrade numpy
pip install --upgrade matplotlib
pip install --upgrade scipy
Some Linux systems may require:
sudo pip install numpy matplotlib scipy

OR perhaps...

sudo pip3 install numpy matplotlib scipy
Install Compiler
Note
Windows users can skip “Install Compiler” and go to Install RocketCEA
Using f2py to compile FORTRAN requires a FORTRAN compiler. I recommend using gfortran on all platforms so that there are no FORTRAN incompatibilities between platforms.
Each operating system has its own approach to install gfortran
Click: Install gfortran to see install instructions for a few platforms that I have tested.
Install RocketCEA
After the above installs have been accomplished, the easiest way to install RocketCEA is:
pip install rocketcea
    OR perhaps
pip install --prefer-binary rocketcea

    OR on Linux
sudo pip install rocketcea
sudo pip3 install rocketcea
    OR perhaps
pip install --user rocketcea
pip3 install --user rocketcea
Try a quick test of the install by pasting the following into a command terminal:
python -c "from rocketcea.cea_obj import CEA_Obj; C=CEA_Obj(oxName='LOX', fuelName='LH2'); print(C.get_Isp())"

should result in:
374.30361765576265
Windows Batch File
For versions of RocketCEA 1.2.0 and above
While the above section should work for Windows binary wheel installs, it is now much easier to install from source code as well.
It will be necessary to Install gfortran, however, once FORTRAN is available, the steps to compile and install RocketCEA are virtually identical to installing binary wheels.
REM =============== Install RocketCEA from Source Code ================

REM make sure that gfortran is in PATH
set PATH=C:\MinGW\mingw64\bin;C:\MinGW\mingw64\lib;%PATH%

REM **OPTIONALLY** install some dependencies
pip install numpy matplotlib scipy

REM install source downloaded from PyPI (e.g. rocketcea-1.2.0.tar.gz OR uncompressed source)
pip install rocketcea-1.2.0.tar.gz
    ... OR ...
pip install .

REM Test the compiled module
python -c "from rocketcea.cea_obj import CEA_Obj; C=CEA_Obj(oxName='LOX', fuelName='LH2'); print(C.get_Isp())"

python -c "from rocketcea.cea_obj import __version__;  print( 'RocketCEA Version:', __version__)"
Old Windows Batch File
Note
3/23/2024: Ignore the following batch file for RocketCEA versions 1.2.0 and above.
Note
3/14/2024: The deprecation of numpy.distutils has made Windows installs much more problematic.
In order to support deprecated features in pip and numpy, we need to use old versions of these packages.
For this reason, you may want to install RocketCEA in a virtual environment rather than your primary installation.
Further, until meson is implemented, RocketCEA only officially supports python 3.7 thru 3.11 on Windows.
Note
for Anaconda on Windows, see “Anaconda Windows Batch File” section below.
RocketCEA on Windows can be problematic. Often the problem is in the PATH environment variable where the wrong files are found for the intended install, and even more often it is because the proper compiler build tools are not available.
The Windows batch file below addresses both of those problems.
Remember that the FORTRAN compiler must also be installed (see: Install MinGW on Windows 10)
Notice that the batch file makes the PATH as simple as possible so that only the 64 bit MinGW files and desired python files are found.
Note that the batch file assumes that python 3.9 64 bit is the python version installed at C:\Python39_64 and that MinGW 64 bit is installed at C:\MinGW\mingw64\bin and C:\MinGW\mingw64\lib. Edit those path names for your situation.
The batch file starts by uninstalling rocketcea in case bad files are left from previous attempts. (This would not be necessary in a fresh virtual environment.)
Finally, note that the batch file installs RocketCEA version 1.1.34 which is likely the last version to depend on numpy.distutils.
You may need to edit the hard-coded paths to your own location of python and MinGW.
Copy and paste the batch file code below into an editor
Edit the hard-coded paths to your own location of python and MinGW (i.e. perhaps change C:\Python39_64 and C:\MinGW\mingw64)
Save the edited BAT file (e.g. as RUN_SETUP_BUILD_WIN64.BAT)
Open a command prompt terminal and navigate to the BAT file directory.
Give the command RUN_SETUP_BUILD_WIN64.BAT
Note
3/14/2024: BAT File successful on Windows 11 virtual environments with 64 bit python 3.7 thru 3.11
The virtual environments had the parent python version’s subdirectories “libs” and “include” copied into them.
rem =============== RUN_SETUP_BUILD_WIN64.BAT ================

rem Make sure that PATH is as simple as possible
SET "MYPYTHONPATH=C:\Python39_64"
set PATH=C:\MinGW\mingw64\bin;C:\MinGW\mingw64\lib;%MYPYTHONPATH%;%MYPYTHONPATH%\Scripts

rem OR perhaps simply...
set PATH=C:\MinGW\mingw64\bin;C:\MinGW\mingw64\lib;%PATH%


REM The trick for installing RocketCEA on Windows seems to be
REM pre-installing the dependency packages (e.g. numpy, scipy and matplotlib)
REM so that the pip option (--global-option) for rocketcea only applies to rocketcea.

rem pip 24.2 will enforce --global-option deprecation
rem     ... so use an older pip
python -m pip install pip==23.3.2

rem future is removed after rocketcea 1.1.34
pip install future

pip install build

pip install wheel==0.38.4

rem in case of an earlier failed attempt to install rocketcea
pip uninstall -y rocketcea

rem setuptools.find_packages is used.
rem for python 3.7 use:  pip install setuptools==59.8.0
pip install setuptools==69.1.1

pip install numpy<=1.26.4
rem pip install numpy==1.25.2

pip install pillow

pip install matplotlib

pip install scipy

rem pip install rocketcea, but with global options.
pip install --global-option build_ext --global-option --compiler=mingw32 rocketcea==1.1.34

rem Test the compiled module
python -c "from rocketcea.cea_obj import CEA_Obj; C=CEA_Obj(oxName='LOX', fuelName='LH2'); print(C.get_Isp())"

python -c "from rocketcea.cea_obj import __version__;  print( 'RocketCEA Version:', __version__)"
Note
The “trick” for installing RocketCEA on Windows seems to be pre-installing the dependency packages (e.g. numpy, scipy and matplotlib) so that the pip options for rocketcea only apply to rocketcea.
If you are having trouble on Windows, you may want to try Windows 10 or 11 with WSL
Anaconda Windows Batch File
Note
3/14/2024: I am Guessing that the deprecation of numpy.distutils has made Anaconda installs only viable in a virtual environment . I’m also Guessing that, on Windows, an Anaconda virtual environment would be successful with the batch file shown above in Windows Batch File
An older install of Anaconda may work with the old and possibly outdated approach below.
As stated above, the “trick” for installing RocketCEA on Windows seems to be pre-installing the dependency packages (e.g. numpy, scipy and matplotlib) so that the pip options for rocketcea only apply to rocketcea.
On Anaconda, many of the required dependencies are preinstalled.
To test the required installs, open an Anaconda prompt, launch python and attempt to import each package. (An example is shown below for Anaconda with python 3.9)
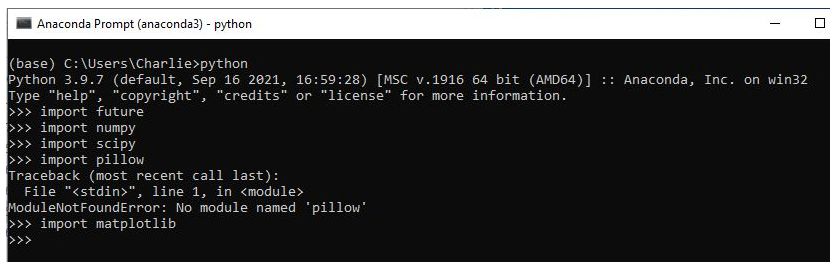
Notice that a fresh install of Anaconda does not include the pillow package.
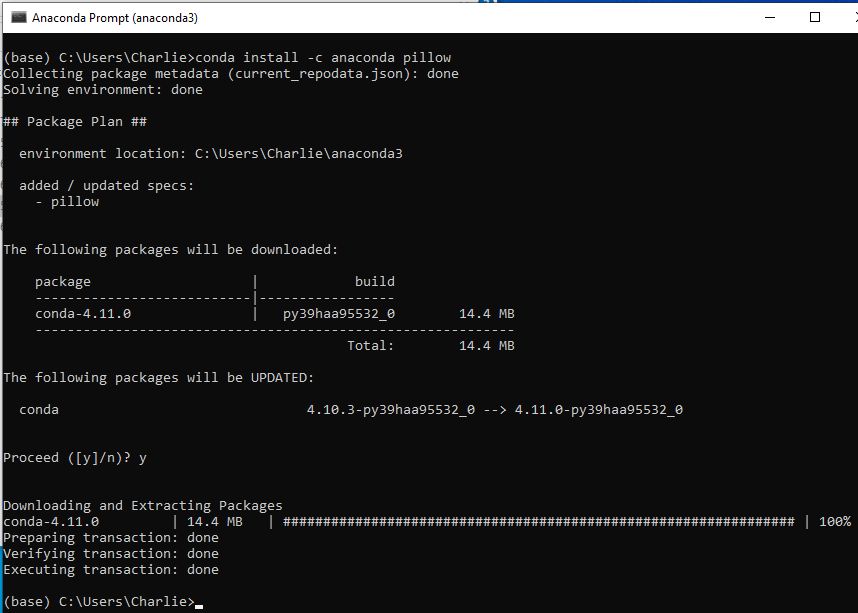
use the command:
conda install -c anaconda pillow
to install pillow . The results will look something like the image below.
With all the dependencies handled, the batch file can be much more simple than the one shown above. Before you can run it, you need to verify the location of the python folders under Anaconda.
To find your python folder, open an Anaconda prompt, launch python, import sys and give the command “sys.executable” as in the image below.
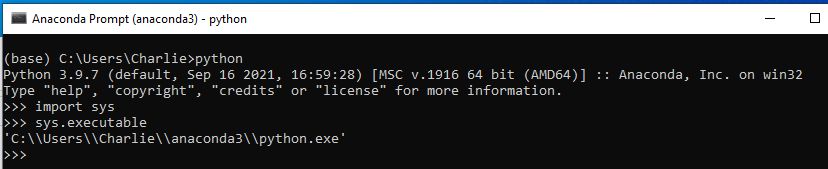
In my case, the path was:
C:\Users\Charlie\anaconda3
Yours will likely be similar.
For the final step, edit the batch file below to replace <YourUserName> with the user name shown in the python path above.
rem NOTICE: MUST Verify dependency installs prior to running this batch file.

SET "MYPYTHONPATH=C:\Users\<YourUserName>\anaconda3"

rem Make sure that PATH is as simple as possible... For Anaconda notice "\Libary\bin"
set PATH=C:\MinGW\mingw64\bin;C:\MinGW\mingw64\lib;%MYPYTHONPATH%;%MYPYTHONPATH%\Scripts;%MYPYTHONPATH%\Library\bin

pip install --global-option build_ext --global-option --compiler=mingw32 rocketcea

rem Test the compiled module
python -c "from rocketcea.cea_obj import CEA_Obj; C=CEA_Obj(oxName='LOX', fuelName='LH2'); print(C.get_Isp())"
Run the batch file and the results will hopefully be similar to the results shown below.

Notice that the file ran the “quick test” at the bottom of the batch file and properly output the Isp of 374.30…
Getting Help
The documentation for RocketCEA is the best place to start.
Go to RocketCEA ReadTheDocs for information.
Running RocketCEA
Any use of RocketCEA begins with an import statement and an instance of CEA_obj:
from rocketcea.cea_obj import CEA_Obj
C = CEA_Obj( oxName='LOX', fuelName='LH2')
In the above example, LOX and LH2 are called out, but any propellants on the Propellants page can be used.
There are a large number of examples included in this document
For instance, look at LOX/LH2 Performance on the Standard Examples page.
To run an example, highlight the source code with your mouse, right click the highlighted code and select Copy. Paste that code into your text editor and save it to a python file.(for example D:\rocketcea\example_1.py).
Example files can be run with the command:
python example1.py
Or, in many text editors hitting the F5 key will execute the code.
Test The Install
Paste the following code into your text editor and save it to your test folder as basic_cea.py (for example, D:\rocketcea\basic_cea.py):
from rocketcea.cea_obj import CEA_Obj
C = CEA_Obj( oxName='LOX', fuelName='LH2')
for mr in range(2,9):
    print(mr, C.get_Isp(Pc=100.0, MR=mr, eps=40.0) )
At the command prompt, give the command:
python basic_cea.py
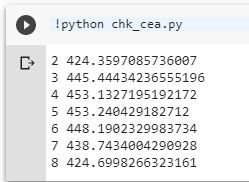
If you see the following output:
(2, 424.3597085736007)
(3, 445.44434236555196)
(4, 453.13271951921837)
(5, 453.240429182719)
(6, 448.190232998362)
(7, 438.74340042907266)
(8, 424.6998266323161)
Great… you are good to go.
If not, see the information below.
Google Colaboratory
If you are having trouble installing RocketCEA on your system, RocketCEA can be run on Google Colaboratory
Colaboratory is a free Jupyter notebook environment that requires no setup and runs entirely in the cloud.
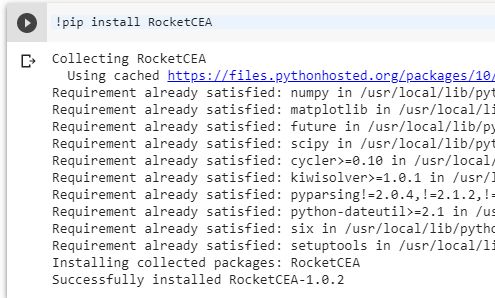
After creating a Colaboratory notebook, install RocketCEA.:
!pip install RocketCEA
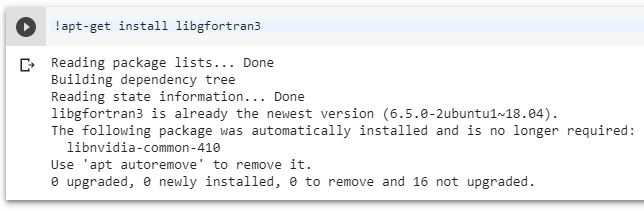
If Needed, install libgfortran3:
!apt-get install libgfortran3
Create a python script to run RocketCEA:
%%file chk_cea.py
from rocketcea.cea_obj import CEA_Obj
C = CEA_Obj( oxName='LOX', fuelName='LH2')
for mr in range(2,9):
    print(mr, C.get_Isp(Pc=100.0, MR=mr, eps=40.0) )

And then run the file:
!python chk_cea.py
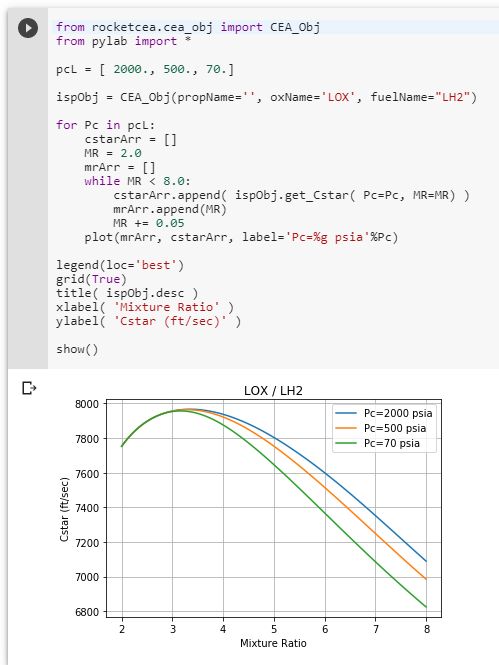
Colab plots work with RocketCEA as well.
Windows 10 or 11 with WSL
RocketCEA can also be installed on Windows Subsystem for Linux (WSL)
After setting up your Linux distribution on WSL, installing RocketCEA is quick and easy.
For example on a fresh Ubuntu distribution, the following will install python 3.10.12 and rocketcea 1.1.34.
(Tested March 14, 2024)
- Update Ubuntu
sudo apt update && upgrade
- configure Ubuntu for python3 and FORTRAN
sudo apt install python3 python3-pip ipython3
sudo apt-get install gfortran
- Install RocketCEA (required libraries should be available)
pip install rocketcea==1.1.34
- Test installation with quick example
python3 -c “from rocketcea.cea_obj import CEA_Obj; C=CEA_Obj(oxName=’LOX’, fuelName=’LH2’); print(C.get_Isp())”
SHOULD RETURN: 374.30361765576896 (or perhaps just very close to it.)
WSL GUI
Note that, if desired, VsXsrv can be used to enable Linux-driven graphic windows on WSL.
This will enable matplotlib show() command, tkinter programs or any gui-based Linux application installed on the WSL Linux distribution.
WSLg
In the presumably near future, WSLg will be available that has GUI support built in. Windows 11 is expected to come with WSLg and Windows 10 will be able to install WSLg.